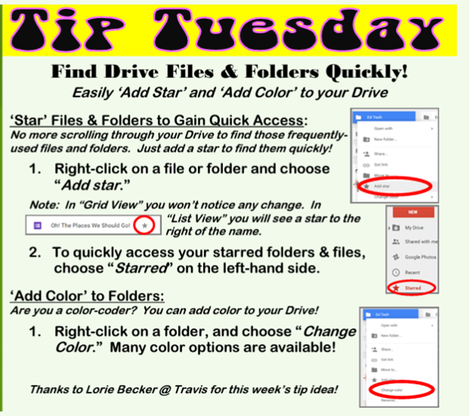
SKYLINE MEDIA CENTER
  • Home
  • Reading is Magical
  • Media Ctr.
    • Destiny Catalog
    • Got Fines?
    • SORA - Ebooks
    • Request a Book
  • Research
    • E-mail Scams
    • News or Not
    • Plagiarism
    • Scrible
  • Tech Links
    • Technology Help for Students
    • Canvas
    • Tech Tip Tuesday Blog
    • Software Information
    • Passwords
    • Student Email
    • Digital Citizenship
  • Skyline Home

Screencastify new features

4/13/2021

1 Comment

 
New features for Spring 2021


Hey there 👋

We're excited to showcase the newest Screencastify features across all three of our products -- Record, Edit, and Submit!

Screencastify Record
New Recording Toolbar - The toolbar is brand new and now includes stickers, shapes, and tools to help your teachers capture and focus their students’ attention. And, teachers can minimize and move the toolbar anywhere they’d like.

Learn more >>

Screencastify Edit
New Blur Tool - Teachers can now blur anything on screen with just one click. This new tool can help your educators obscure private information, focus student attention, block out visual "noise", and so much more.

Learn more >>
 
 
New Title Clips - Title clips are available now. Have your teachers try using a title clip to give each video a name, break up their awesome content with descriptive clips, or allow students to see information in multiple modalities.
 
Learn how >>
 
 
Updated Text Tool (Coming Soon) - Soon, the text tool will be more flexible. Teachers will be able to drag and resize the text box anywhere on the clip. And, they’ll be able to add multiple text boxes to one clip.

Screencastify Submit
New Google Classroom Integration - Submit is fully integrated with Google Classroom. Your educators can create assignments that display in Classroom and receive all of the videos there, too. Teachers can also differentiate assignments based on class or student, grade in a flash, and provide better feedback within Classroom.

Learn more >>

Coming Soon: Viewer Analytics
We’re working on new functionality that will positively impact everyone creating and sharing videos!

A New Watch Page: We’ve created a new way to watch Screencastify videos. And, the best part is that videos load immediately.

Analytics: Our new Watch Page isn’t just lightning fast. It’s also packing a big punch. When you share the Watch Page link, you’ll be able to see who has watched your videos, when, and how many times.

Check out this rundown of the new features from Associate Product Manager, Jen Juang.

Watch video >>


1 Comment

Getting Snip & sketch on my toolbar

3/24/2021

0 Comments

 
​How do I get the Snip & Sketch tool on my toolbar?
  1.  Find the Snip & Sketch through the start menu.
  2. Highlight (by floating over the words), and right click.
  3. Click on More and choose Pin to Taskbar.  You can also, pin to Start if you prefer.
Picture
0 Comments

Using snip & sketch for screenshots

3/24/2021

0 Comments

 
​Have you ever wanted to save a screenshot for later, but have always had to drop it into a document or some other form to save it?  Here is a way to use the Snip & Sketch tool to save screenshots and use them in another document later.
  1. Go to Start and locate Snip & Sketch
Picture
      2.   Click on the name.  It will open the Snip & Sketch app.
Picture
     3.  In the top left corner click on “New”.  This will gray out your screens and give you the crosshairs.  Which you can then drag to incorporate the part of the screen you want in your image.
     4.  Once you let go it will open the Snip & Sketch window and give you the options to mark up and, save the image.
     5.  You can then click on the floppy disk icon in the top right and save to a file of your choice.
Picture
     6.  The shortcut keys for using Snip & Sketch are Shift +Windows +S.  These will work if you want to use a screenshot in a document you are creating and already have it open.
             a.  You can drop it directly into your document using the Ctrl +V paste shortcut.
​             b.  However, this will not give you the mark-up tools that are available, nor the option to save in another location.
What if I want a Screenshot of both screens?
  1.  This can also, be done but without the use of the Snip & Sketch tool.
  2. Use the Windows key +Print Screen.
  3. The screens will flash gray and take the capture of both screens.
  4.  This version will automatically save the screen shot (of both screens) in your Windows Pictures Folder under Screenshots.
Picture
0 Comments

Zoom password

2/17/2021

0 Comments

 
​Webpage Version:

  1. Log into zoom.us
  2. In the upper right corner you will see “My Account” click on this.
  3. This will open your Profile.
  4. On the far left you will see “Meetings”.  
Picture
     5.  Click here and then choose “Personal Room”. 
Picture
    6.  When the information for your personal room comes up click “Edit” at the bottom.
    7.  This will open all of the settings for your Personal Meeting Room.
    8.  Under “Security” you will want to recheck the “Passcode” box.
Picture
   9.  Scroll down and hit "Save".

Desktop App Version:
  1. Find the app either on your desktop or through the start menu.
  2. Sign in.
  3. If it doesn’t default to your “Personal Meeting ID” then click “Meetings" along the top.
Picture
​    4. Once you see “My Personal meeting ID (PMI) you will want to click “Edit” right below that.
Picture
   5.  On the new window that pops up please recheck the “Passcode” box, and then Save.
Picture
0 Comments

Slideshow templates

2/17/2021

0 Comments

 
​Are you tired of the same boring slideshow templates?
 
Check out Slides Carnival   and/or  Slides Mania
 
Templates on both of these sites can be used in Google Slides or Powerpoint.
 
0 Comments

Remove Background

2/10/2021

0 Comments

 
​Have you ever wanted to remove a background from an image so you can use it elsewhere.  (Yes, I know this can be done in Microsoft Office products as well.  But this is easier.)
 
Try using  remove.bg  
 
You do not have to have an account to remove backgrounds.  However, you will may want one as they give you free credits which can then be used for high quality digital downloads.  You can remove backgrounds without saving in high quality without an account or without credits.
 
This is a great way to remove those backgrounds quick and easy.  It is also, more fun than trying to make sure you get every little thing removed in Microsoft.
0 Comments

Canvas Course Publishing

1/19/2021

0 Comments

 
​Please sign in with your graniteschools.org email. 
Picture
0 Comments

Second semester gradebook

1/19/2021

0 Comments

 
​GRADEBOOK:
Many of you have come and asked this morning why you can’t take attendance.  This is because the settings in Gradebook are not correct.
 
Gradebook Settings:
  1. Under “Settings” and then “Options” in Gradebook. You will see the settings window open.
Picture
   2.  If you have the settings so they look like those above it will automatically shift to the next quarter and semester.
         a. Under  “Display Settings”i.“Display Gradebook Average As” should be set to Current Grading Period
         b. Under “Assignment Filter” you should have the radial button marked for “Current Assignments”
         c. Under “Login Defaults” Parameters should be set to blank.
0 Comments

Second semester canvas:

1/19/2021

0 Comments

 
​CANVAS:
I have had quite a few students and teachers come and ask me why links on their new semester courses don’t work.  Well there are a couple of reasons.
  1. You copied the content and pasted it into the new course, instead of importing content.
  2. The link is actually no longer valid.
Students and parents are asking why they can’t see the courses.  Below are two ways to trouble shoot this.
  1. Publish the courses
  2. Make sure courses are activated to show on Dashboard.
 
CANVAS Importing Content:
 
Here is what you want to do to fix the issue of the copy and paste.
  1. You will need to “Import Existing Content” using the button on the home page in CANVAS.
  2.  On the new window that pops up under Content Type choose “Copy a Canvas Course”. 
  3. Under “Search for a Course” start typing the course title or the course number and you will see your courses pop up.  If you want to copy from first semester this year you want to find the course with 646-2021-X-1.  If you want to copy from another year the number in the middle is the graduation year.
  4. Make sure that you check the radial buttons for “Select Specific Content” and “Adjust Events and Due Dates".  "Remove Dates", if you don't do this you won't be able to change the dates to something next semester.
  5. Then click Import
  6. Under “Current Jobs” you will then see a new blue button that says “Specific Content”.
    1. Click on that and it will give you all of the things that you can import over.  Make sure you take your Syllabus, Pages, and Course Content.
 
 
Here is another fix:
  1. Find the broken links and items and go back to them.
  2. Copy the URL and put it back in on each page.
 
 
CANVAS Publishing:
I have sent directions in email as to how to publish courses.  Please make sure your courses are published.
 
CANVAS courses missing:
If students have transferred into your classes after the initial enrollment date of today they may not see your CANVAS courses.  Here is how you can help them so they show up.
  1. Go to the students CANVAS account and under courses click “All courses”
  2. This will show a list of any and all courses the students have ever been enrolled in. 
  3. Find the missing courses and click the star in front of it until it turns orange.
  4. Go back to the Dashboard and the courses should now show up.
0 Comments

second semester canvas setup

1/5/2021

0 Comments

 
  1. Cross-listing (Merging) Courses in Canvas –  teachers can now cross-list second semester courses.
Print Instructions
Video Instructions
 
              Refresher on Cross-listing
Cross-listing allows teachers to create content ONE TIME for all the sections they teach that are the same. For example: A teacher teaches Math 8 three times a day. Rather than creating canvas content three times, the teacher cross-lists the sections/class periods so they can create the content one time. 
Benefits of cross listing
  1. HUGE TIME SAVER!
  2. Teachers can still see one class at a time or all sections
  3. Teachers can create an assignment once but give different due dates for each section or even for just one student.
  4. Teachers can assign an assignment to one section or all sections.
  5. GT and CORE teachers can cross-list and have some assignments the same and some different.
Potential issues with cross-listing 
  1. Teachers could cross-list to the wrong course or a past course.
  2. Once cross-listed, the LMETS is the only ones who can de-cross-list
  3. De-cross-listing after assignments are turned in and scored means at least one section LOSES all submissions and scores.
​
0 Comments
<<Previous
Forward>>

    Categories

    All
    Books
    Canvas
    Google
    Google Drive
    Gradebook
    Grades
    LanSchool
    Loom
    Media Center
    Microsoft
    Miscellaneous
    Phone
    Powerpoint
    Screencastify
    Snip & Sketch
    Teams
    Zoom

    Archives

    May 2023
    April 2023
    February 2023
    November 2022
    November 2021
    October 2021
    September 2021
    April 2021
    March 2021
    February 2021
    January 2021
    December 2020
    November 2020
    October 2020
    September 2020

    RSS Feed

Powered by Create your own unique website with customizable templates.